
📜 A Heirloom Worth Baking: The Story Behind the Buttermilk Rolls
There’s something incredibly comforting about baking from old family recipes. This recipe for Layered Buttermilk Rolls comes straight from the pages of my grandmother’s well-worn cookbook—the same one she received as a wedding gift in 1948. Listed simply as a “picnic roll,” the recipe caught my eye for its simplicity—and won my heart for its tender, buttery pull-apart layers.
But what makes it picnic-perfect? The buttery richness baked right in. No need for extra slathering. Just pull one apart and you’ll see why this vintage gem has stood the test of time.
🥛 Buttermilk: More Than Just a Baking Liquid
Before we dive into the recipe, let’s take a moment to celebrate the unsung hero here: buttermilk. It’s not just leftover liquid from butter making—it’s a nutritional powerhouse.
Here’s why we love it:
- Calcium-rich for strong bones
- Lactic acid promotes gut health
- Probiotic properties support digestion
- Helps tenderize baked goods for a soft, fluffy texture
So if you’ve got some buttermilk lingering in the fridge after making pancakes or marinating chicken—don’t toss it. Bake these rolls instead!
INGREDIENTS
- 2-1/4 teaspoon yeast
- 2 cups warm buttermilk
- 1/3 cup warm cream
- 1/4 cup sugar
- 2 tablespoons melted butter
- 4 cups flour divided in half
- 1/4 teaspoon baking soda
- 2 teaspoons salt
DIRECTIONS
1. Start the Dough
In a large bowl, combine:
- yeast
- warm buttermilk
- warm cream
- sugar
- melted butter
Let the mixture sit for a few minutes until the yeast is slightly foamy.
2. Mix in the First Flour Batch
Sift in:
- 2 cups of flour
- baking soda
- salt
Mix until smooth.
3. Add the Rest of the Flour
Sift and mix in the remaining 2 cups of flour. Work it into the dough using a sturdy spoon or your hands. If the dough feels too sticky, add a bit more flour gradually—but stop before it becomes stiff. This is meant to be a soft dough.
💡 Pro Tip: For cloud-like rolls, use high-gluten flour or substitute ½ cup of your flour with vital wheat gluten.
4. First Rise
Transfer the dough to a greased bowl. Cover with a clean kitchen towel and let it rise in a warm spot for about 2 hours, or until it’s doubled or even tripled in size.
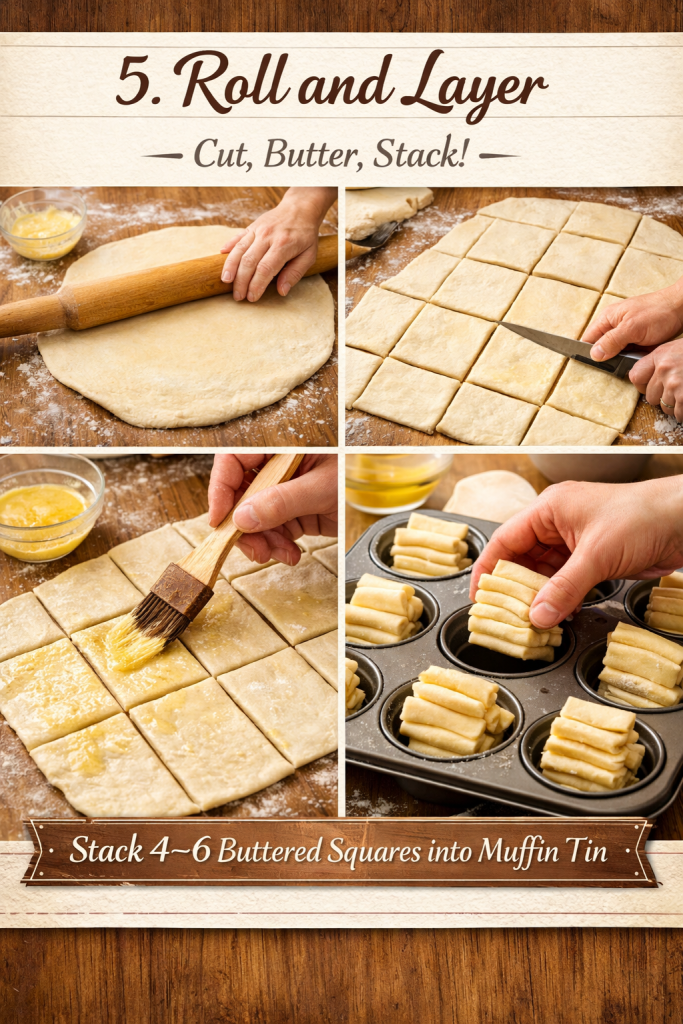
5. Roll and Layer
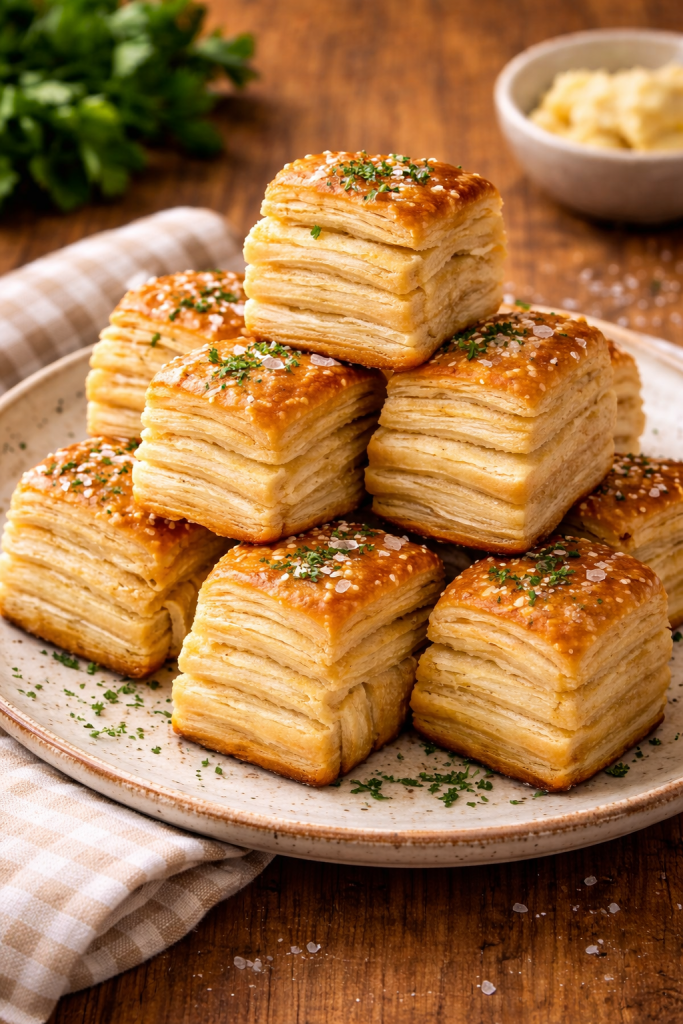
Punch down the dough and divide it into manageable sections. Roll each section out to ⅛–¼ inch thick. Cut into large squares, brush each one with melted butter, and then cut those squares into smaller 2-inch squares.
Stack 4–6 of these buttered squares sideways into the cups of a greased muffin tin.
6. Second Rise
Cover loosely and allow the shaped rolls to rise again in a warm place for 30 minutes, or until they’ve doubled in size.
Preheat oven to 425°F (220°C). Bake the rolls for 15–20 minutes, or until golden brown on top and cooked through.
Brush with melted butter straight from the oven, if desired.
👩🍳 Tips for Buttermilk Roll Success
- Use room-temp buttermilk: Cold buttermilk can slow the yeast.
- Don’t skimp on butter between layers: This is what gives that pull-apart magic.
- Grease your pan well: These babies like to stick if you don’t.
- Try variations: Add herbs, shredded cheese, or garlic butter between layers for a flavor twist.
🧺 Why Layered Buttermilk Rolls and Called Picnic Rolls
My grandmother’s cookbook called them “picnic rolls” because they don’t need any extra toppings. The butter baked into each layer means they’re delicious straight from the basket—no knife or spread necessary. Whether you’re setting them out for a sunny outdoor lunch or serving alongside a holiday roast, these rolls deliver comfort with every bite.
🔄 Make Ahead & Freeze Instructions
Want to prep ahead? Shape the rolls and freeze before their second rise. When ready to bake, thaw them in the fridge overnight, then let them rise at room temp for an hour before baking as usual. They also freeze beautifully once baked—just reheat at 300°F wrapped in foil for 10–15 minutes.
❤️ Final Thoughts: A Buttermilk Roll to Remember
These Layered Buttermilk Rolls are more than just a side—they’re a little piece of family history. The layers pull apart with the lightest touch, revealing tender, buttery softness inside. And thanks to the buttermilk, they stay moist, flavorful, and just tangy enough to keep things interesting.
If you’ve been wondering what to do with leftover buttermilk, this is your sign to bake something unforgettable.